Wednesday, February 28, 2018

why your phone screen broken again?

With the smart phone becomes more and more popular , the more problem appears, we will share an article about the process which teach us how to repair and protect our phone.Whether you have dropped your handset on the sidewalk or someone else smacked it out of your hands,we believe this article will be useful for your iPhone using,even more.

Once your iPhone happened damaged, do you know how you should do next? We will share one of situation about the LCD screen broken.First of all, assess the damage, and that means getting your phone on a solid surface and in a good light, not just giving it a quick once-over before stuffing it back in your pocket.

With a little bit of stress testing and careful prodding you should be able to work out whether the screen is about to fall off or fail completely. In a lot of cases it will stay in place, cracks and all, so you can at least keep tweeting, so long as the screen is still visible and functioning.

More,it's difficult to completely eliminate the risk of smashing your phone screen, no matter how careful you are with it. Leaving it at home in a desk drawer kind of defeats the point of having a mobile phone in the first place.

Should a smashed screen prompt you to go for an upgrade, don't just throw your old phone away. Send it to a local recycling scheme, or try and sell it through Amazon—there are plenty of people who'll be willing to buy a smashed phone, because they'll do the repairs themselves, then sell it for a profit.


Until phones become unbreakable, though, you can still recover from a smashed screen without too much drama. It just might cost you a buck or two.

Sunday, February 11, 2018

Introduce iPhone 6 No Backlight Fault and Solve it

Got the same default :
iPhone Touch Screen can't display while the screen shows good and motherboard can work normally.
The first step we do still is to check the motherboard to get the current and current, it shows normally, so we have to check other's part.

Fix Process:
First use DC power supply to measure the boot current on iPhone, the boot current is normal. Tilt the iPhone screen, we can see the Apple LOGO, which means the iPhone 6 is not no display but without the backlight.

Remove the iPhone motherboard and measure the resistance of display socket backlight circuit and backlight power supply by Fluke 15B+ Digital Multimeter, we found the data of backlight power supply only has 97, but the normal data is more than 400.


Picture 14-12-1
Take off the iPhone CPU shield to check the components near the backlight. After check it under the VGA Camera 7-45X Trinocular Stereo Microscope, it was found that the backlight diode had been burnt, and the big inductance also is cracked and discolored. In this case, the elements on the back light path should all be damaged, we need to remove all components and replace the new.


Picture 14-12-2
After replacement, turn on iPhone to test, now the iPhone screen displays normally, the repairs end!
 
Picture 14-12-3

Friday, February 9, 2018

Fix iPhone 6S No Service

Fault Description and Possibility Reason:
Fault: iPhone 6S no service and no signal
Possibility Reason: Signal receiving part or signal transmitting part damaged.
We confirmed the fault , boot it and check the security setting. Ready to start our repair process.


14-11-1

The iPhone 6s has no service with sim card but it shows operator in the setting, which indicating that there is no problem on the signal reception, so we judge the fault is on the signal transmitting part.

The signal transmitting part is sent out from the RF IC chip through the 2G amplifier chip and then through the iPhone antenna switch chip.

In iPhone repairs, the 2G power amplifier failure probability is very high, so we replace the iPhone 6 2G amplifier U2GPA_RF chip by QUICK 861DW hot rework station and related professional repair tools, but the same failure is still existing, it seems that the 2G amplifier has no problem.

So we have to transfer previous judgement, now we are going to to replace the iPhone 6S radio frequency IC U _WTR_RF chip, it finally shows normal, and also normal for calling or receiving calls.
14-11-2


14-11-3

Therefore, it is found that the RF IC U_WTR_RF chip damage can also cause cell phone has no service. 

Thursday, February 8, 2018

Deal iPhone 6 No Display As of Screen Replaced

After changing a new screen, the iPhone 6 can't display, maybe most of us happens this situation, this article aims to provide a efficient way. We have to disassemble it, we connected it with DC Power supply, the diode data of display socket and iPhone display IC output are normal. But when we check the motherboard current output, the value shows abnormal, so we doubt there exist some failure in motherboard.

The current reached 100mA when press the power button. After remove the display tube, the current still the same, which means there is a short circuit. Measure the voltage output of each circuit of power supply with Fluke 15B+ Digital Multimeter, then surprised to find that there are really short circuit places.

LD010 is short circuit; we suspect that the filter capacitance on the circuit has been penetrated. After remove the iPhone power control IC, we found it is ground short circuit. Open the WUXINJI Dongle to check the iPhone schematic circuit, we found that this circuit is the display card image transmission MIPI data bus power supply.


Picture 14-10-1

CPU breakdown, the iPhone 6 doesn't display is possibly caused by physical damaged that the iPhone display screen electrostatic breakdown the CPU internal video card part. Put it under the 7-45X 180X Stereo Zoom Microscope, adjust the stable voltage to 1.5V, and then shock this circuit. At the shock moment, the power meter current jumps to more than 500 mA and then becomes 0. Shock it again, the current is not responding. Measuring the diode data shown is 180.


Picture 14-10-2

Install the main power, and then connect it to DC power supply to turn it on, the current not start from 100mA, but start from normal data 60mA. Assemble the iPhone display screen to test; now the iPhone 6 can be displayed normally.


Picture 14-10-3

Wednesday, February 7, 2018

Entirely Way for iPhone 6S Plus No Sound

The next repaired iPhone occurred no sound failure ,but it can be heart when plugging earphone, and we know the ring bell doesn't vibrate through the attached file. So let us start our repair process:
Picture 14-9-1
The first step is to judge the fault, if there is no speaker voice when playing music on iPhone, generally the fault is caused by iPhone audio amplifier chips. There are 2 Audio Power Amplifiers: U3700 and U3800.
Which chip is out of problem? The previous test has said that the vibration function is not normal. The vibration function is managed by U3800 chip. Therefore, we remove the U3800 chip to measure the ground resistance of the chip pad. It is found that the E7pin I2S_AP_TO_ARC_MCLK  ground resistance is infinitely great.

In WUXINJI schematic diagram, it is known that the signal passes through the R0921 resistance to the iPhone 6s Plus CPU.
Picture 14-9-2
In the measurement, it is found that the CPU solder joint is broken down to the R0921 resistance layer. It is not easy to dig the route on the plate layer, so we try to borrow the 12S_AP_TO_CODEC_MCLK signal of the audio IC chip,soldering jumper wire from the R0920 resistance to the R0921 resistor.
Picture 14-9-3
Picture 14-9-4

Install to test, the sound is playing normal, vibration becomes normal and the sound of recording is also normal now! 

Tuesday, February 6, 2018

Repair iPhone 6 Plus No Rear Camera While No Flashlight

According to the attached file, we know the iPhone 6 Plus occurred the  rear camera won't open while flashlight can't be turned on.Usually one of them happens some fault , there will be a big possibility to cause another one can't work normally. So we need to disassemble it to confirm the fault source.

Picture 14-8-1


Picture 14-8-2
Use JM-P01 Essential Phone Repair Toolkit to remove the iPhone motherboard, and observe it under the 7-45X 180X Stereo Zoom Microscope, we found the U3200 chip had traces of moldy by water.


Picture 14-8-3
 With the help of QUICK 861DW and Precision Titanium Alloy Tweezers, we remove the chip smoothly and quickly. And then we found out that the U3200 chip 4-pin pp_vcc_main powered pin had corroded.


Picture 14-8-4
Measure the diode data of this pin with Fluke 15B+ Digital Multimeter, it is infinitely large. Check the iPhone schematic diagram found that PP_VCC_MAIN is through the FL3202 inductance input to the U3200 chip 4 pin. The FL3202 inductance has been corroded under the microscope observation.


Picture 14-8-5
 Here it means we finished the repair process, and now we need to mend the U3200 Power supply IC well to install iPhone and test. We can see the fault was repaired, the function shows well.That's ending

Monday, February 5, 2018

Wise Way for iPhone 6 No Reply

Fault Description:
No series number shows up when dialing *#06#  and kept searching state without signal.
First step is to disassemble the basic, we found  iPhone 6 LCD Screen was replaced ever, we doubt there occurred an Baseband CPU false Welding error, Following our repair process:

From the simple start, measuring the single iPhone 6 motherboard baseband power supply, first measure the main power supply 4.2V (C3221_RF)

                                                                                              14-7-1

Then testing baseband output voltage of power supply on C3262, C3252, C3259, C3256, if there is a voltage without first measuring resistance, if resistance is normal, then replace normal baseband power test; if four of them are simultaneously without resistance, then you need to reinstall the baseband CPU. There is a small glass tube base strip above the baseband power supply, it must be noticed when the main board is disassembled, if it gets damaged, the iPhone 6 will not be repaired.

Before the iPhone 6 CPU is removed, we must deal with the shielding cover carefully. We need to cut it off with professional cell phone repair scissors. This is relatively safe. The shielding factory is very strong in welding, and the risk of heating and blowing is relatively large.

The baseband CPU can be mounted on the fan to avoid heating IC.  It doesn't matter if you see some empty solder points. It takes two parts to solder jumper wire on the pad: U1 and V1 pin.


14-7-2

It may be okay to see two points on the naked eye, but under a Trinocular Stereo Microscope, it will be found that the two points are at the top of the layer, and the line is very thin. Sometimes there will be baseband faults when the line is disconnected. For the sake of insurance, solder jumper wire first.


14-7-3

The small U is thicker. When do CPU reballing, you can cut out a small square on the paper towel and put the small U in it. After installing the baseband CPU, you can first test the C3402_RF to determine whether whether the baseband CPU is installed ok.

After we confirmed it again , boot it. Both baseband and signal shows normal!

Friday, February 2, 2018

Repair iPhone 6 Plus Camera and Fingerprint Inoperation

Fault Description:
iPhone 6 Plus fingerprint and front camera can't work normally same time.
According to the client's words, we knew it has been replaced an iPhone black touch IC. So we doubt the back of component may cause some hurt, okay, let we start our test and repair.

Same problem with the last iPhone, but there an another problem that the fingerprint can't work. And after we open it, we found the touch IC  was replaced ,so we doubt there exist an failure in this component. Let us start the test and repair

First of all, measure the diode data of rear camera adapter with Fluke 15B+ Digital Multimeter, no exceptions found. Then measure the rear camera power supply.
Picture 14-6-1
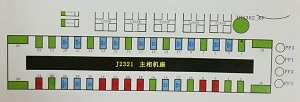
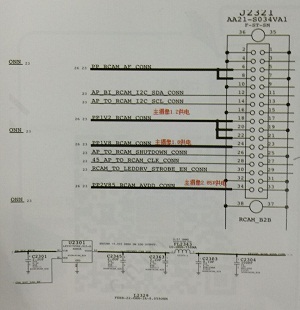
Measure the main camera 1.8V and 1.2V power supply, when we measured the 2.85V power supply, we found that it had no power. Check the iPhone 6 Plus schematic diagram on WUXINJI Dongle to trace the 2.85V source.
Picture 14-6-2

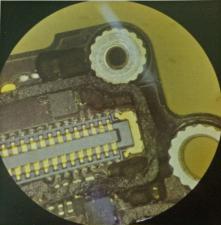
We found that the 2.85V was converted from the main power supply through U2301. During the repair process, short connection A1 and A2 pin can quickly determine if 2.85V power is causing the iPhone camera not working. After short connect A1 and A2 pin, get into IOS to test the iPhone rear camera, it can be turned on now, but short connect 2.85V conversion tube can only test whether it is caused by 2.85V. We can't stop the repairs, because the voltage of PP_VCC_MAIN is 4V, but the power supply of this circuit is 2.85V.
Picture 14-6-3

Direct short connection, take pictures in the darkness, sometimes there are white stripes, you not only can replace the conversion tube here, but also can weld jump wire from the iPhone Nand flash 3V. Generally we weld the jump wire from iPhone Nand flash 3V power supply.
Picture 14-6-4

After finished the welded jump wire, we start to repair fingerprint. First measure the diode data of fingerprint socket. When measured the 12th pin AP_TO_MESA_SPI_MOSI_CONN, its resistance is infinitely large. Trace AP_TO_MESA_SPI_MOSI_CONN signal, we found that it was renamed directly by AP_TOMESA_SPI_MOSI through inductance fl2132. Since there are components in the middle, then we just check FL2132 under the 7-45X 180X Stereo Zoom Microscope 


Picture 14-6-5

Gently wave the components with Precision Titanium Alloy Tweezers, we found it had fallen off. According to iPhone circuit diagram, we know that this inductance is an insurance inductor; the insurance inductor can short-circuit the two pins directly together. When finished, assemble iPhone and test, fingerprints are fine now, the repairs end!


Picture 14-6-6

Thursday, February 1, 2018

Best Way for iPhone 6 WiFi Fault Repair

WiFi question usually will be attention more than other abnormal. The next phone we will repair has the weak WiFi signal which means iPhone 6 Wi-Fi Module can't work normally , we need to find a better solution for this question as we have repaired a similar one. Like the following picture show:


14-5-1

Test whether the main power supply 4.2V has been delivered on C5202_RF, if not, it can be supplied from any place with main power supply, or directly replace WIFI module.


14-5-2

Before disassembly, we need to do some protection to avoid blowing other chips. The WIFI module is surrounded by glue. We must first preheat and remove the glue, and pay attention to small components, especially small resistors. you must to solder it again if some of the components are lost.

The WIFI module on line is relatively thin, do not use solder iron back and forth on iPhone solder pad, testing resistance again after cleaning.

As shown in figure 14-5-3, the lower right-hand corner is easy to break, and the normal is infinite. Therefore, it is necessary to measure whether it is connected to the external connecting elements, if not, it's necessary to solder jumper wire.
14-5-3


There are two kinds of WIFI modules in the market: high temperature and low temperature. We use low temperature and control at about 240 degrees, then install to test the iPhone device. First use the DC power supply to add electricity, Generally if IC involved in the main power supply circuit, do not directly use the battery to boot after replacing IC as to avoid the motherboard burning, after replacing chip, the fault is solved.

If you encounter WIFI can be opened, but only found a small amount of signal, this problem belongs to the WIFI signal, the forty-fifth pin takes main factors, after removing WIFI which can be observed under VGA 7-45X Trinocular Stereo Microscope  .